

"앱인벤터 다이어리"의 Screen1(시작화면)과 Screen2(메뉴화면)의
화면 디자인 및 블록코딩은 이전 포스팅을 참고해주세요!
[프로젝트/App Inventor] - [App Inventor] 앱인벤터 다이어리/메모장 만들기 #2
[App Inventor] 앱인벤터 다이어리/메모장 만들기 #2
"앱인벤터 다이어리"의 전체적인 구상도는 이전 포스팅을 참고해주세요! [프로젝트/App Inventor] - [App Inventor] 앱인벤터 다이어리/메모장 만들기 #1 [App Inventor] 앱인벤터 다이어리/메모장 만들기 #1
psjin230.tistory.com
목차
- Screen3 달력을 이용한 다이어리
- Screen3 Designer
Screen3은 이지이지(EGEasy) 블로그를 참고하여 제작하였습니다.
Screen3은 달력을 이용한 다이어리로, 달력을 만들고 하단에 추가버튼을 클릭하면 일기를 추가할 수 있는 화면이 뜨도록 만들었습니다. 일기가 기록된 날짜에는 ♥가 나타나고, 해당 날짜를 누르면 일기를 볼 수 있는 상세 화면으로 넘어갑니다.
1. Screen3 달력을 이용한 다이어리
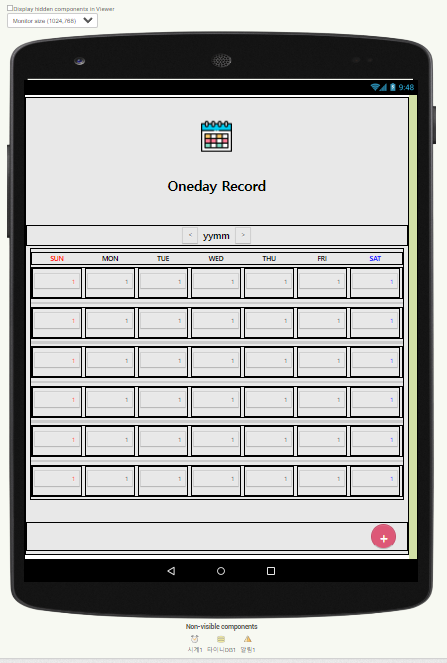
Screen3 달력을 이용한 다이어리 화면입니다. Viewer에서 Phone size로 확인하면 컴포넌트가 조금씩 잘리게 보입니다. 스마트폰으로 실행하면 정상적으로 작동합니다. Phone size에서는 컴포넌트들이 잘려서 Monitor size 화면도 함께 첨부합니다.
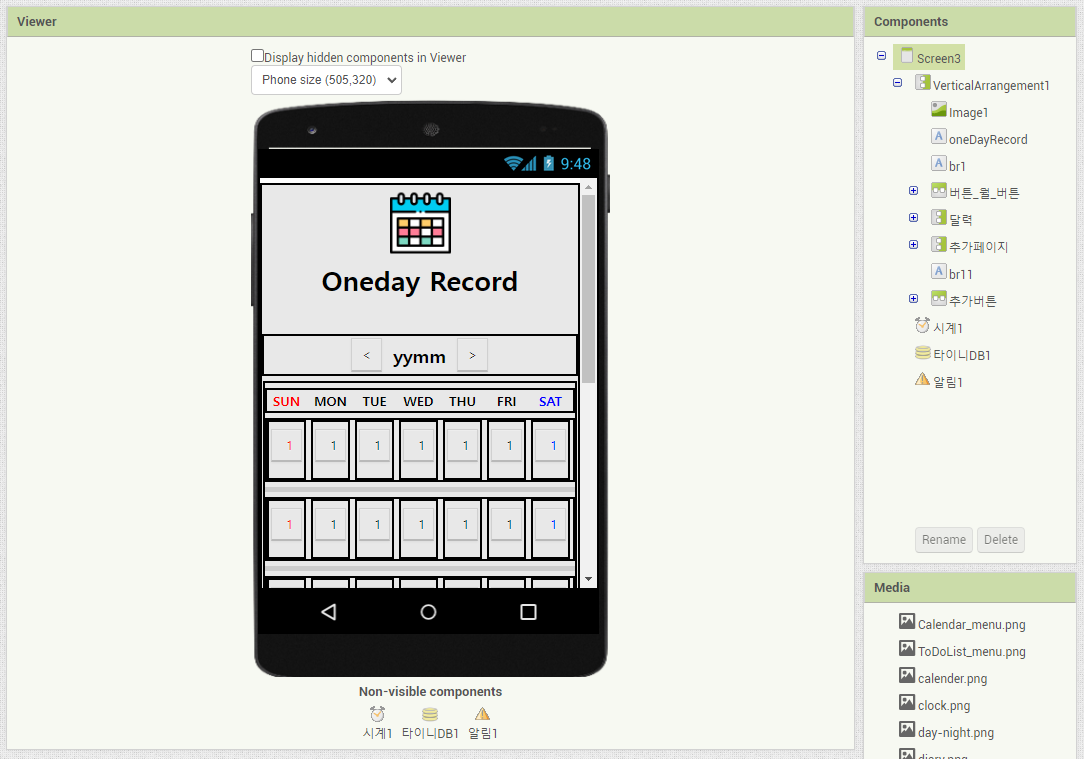
2. Screen3 Designer
하단 시계1은 Sensors-Clock(센서-시계), 타이니DB1은 Storage-TinyDB(저장소-타이니DB), 알림1은 User Interface-Notifier(사용자 인터페이스-알림)를 드래그앤드롭하면 됩니다.

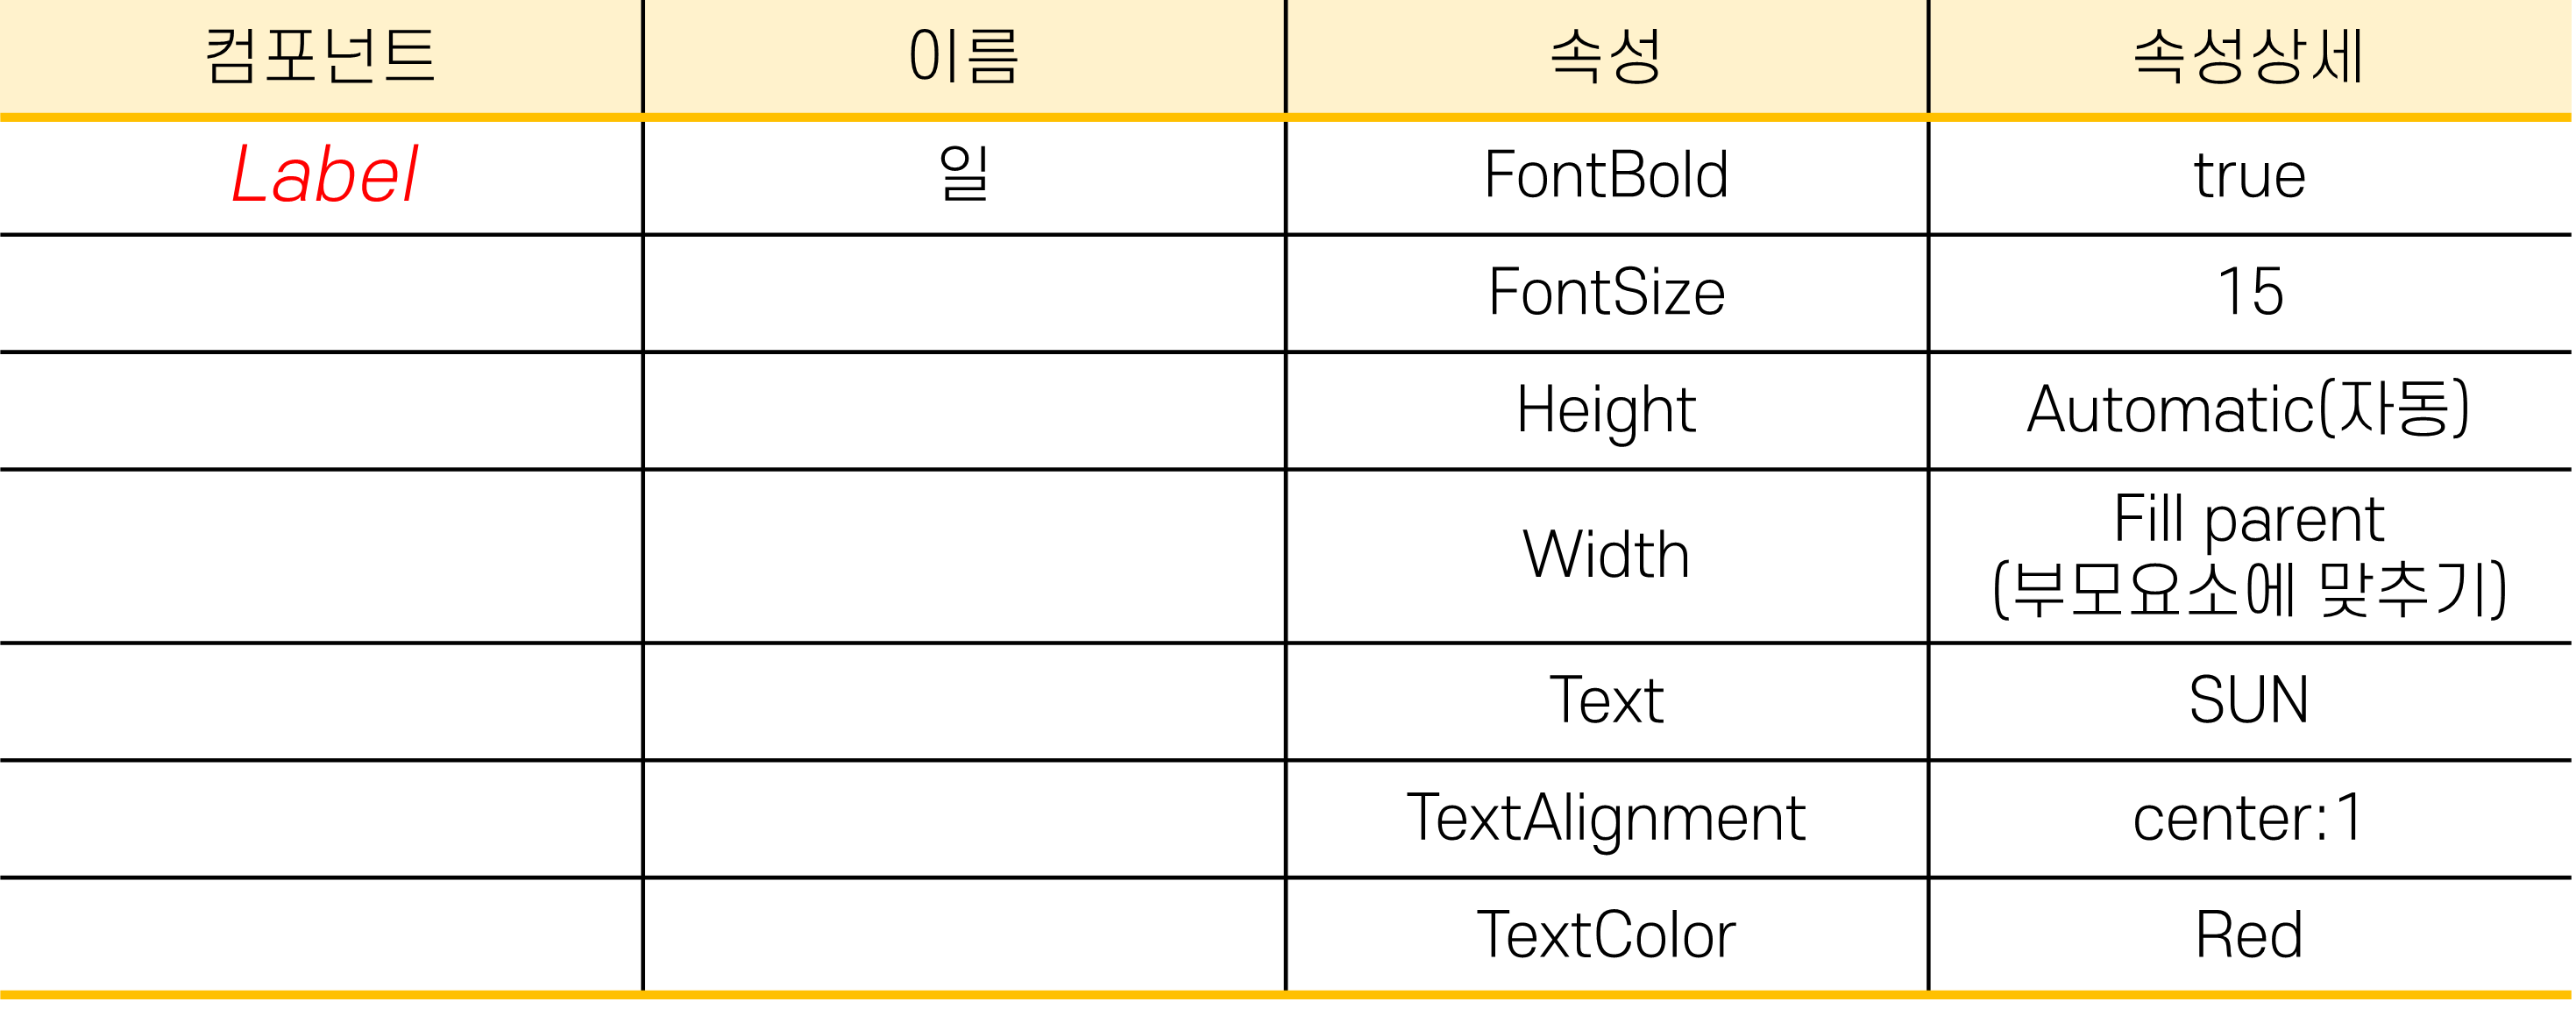
아래 표와 같이 Label을 일,월,화...금,토까지 7개를 만든다. 토요일은 TextColor를 Blue로 설정한다.
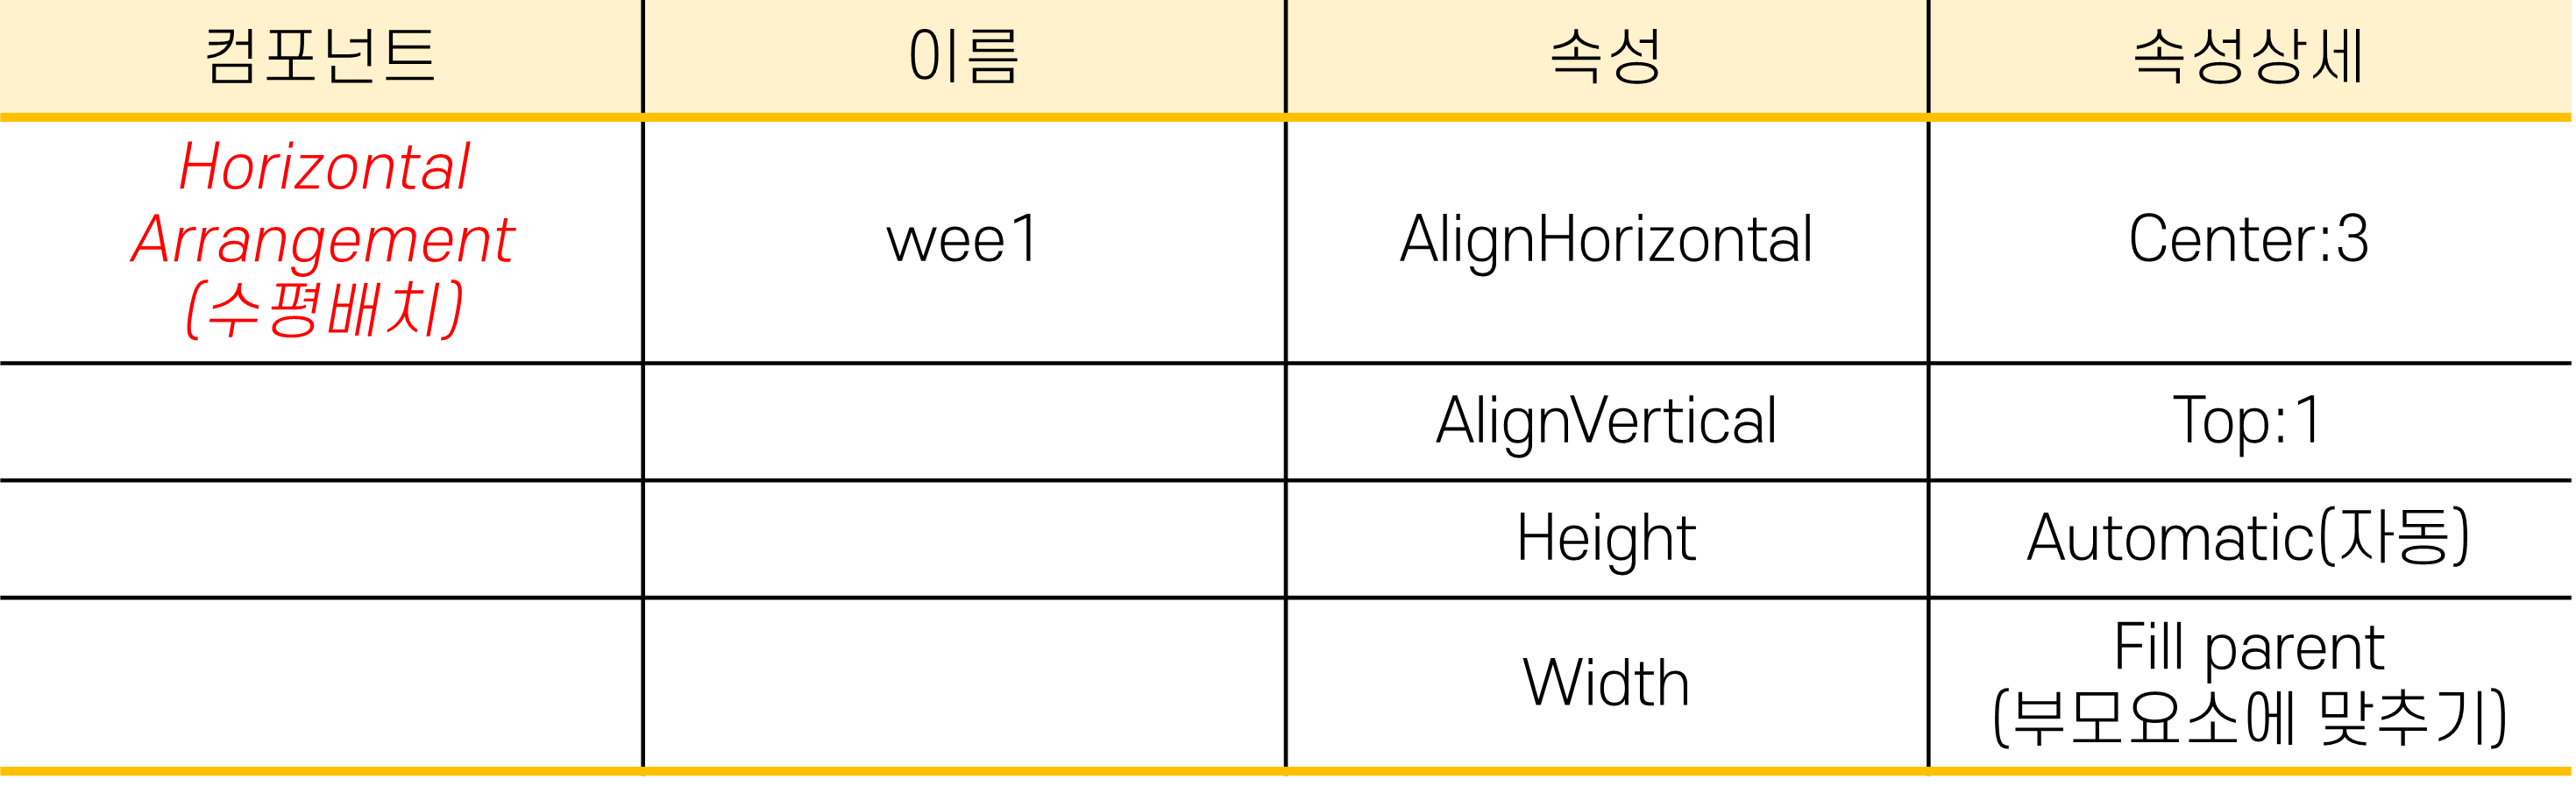
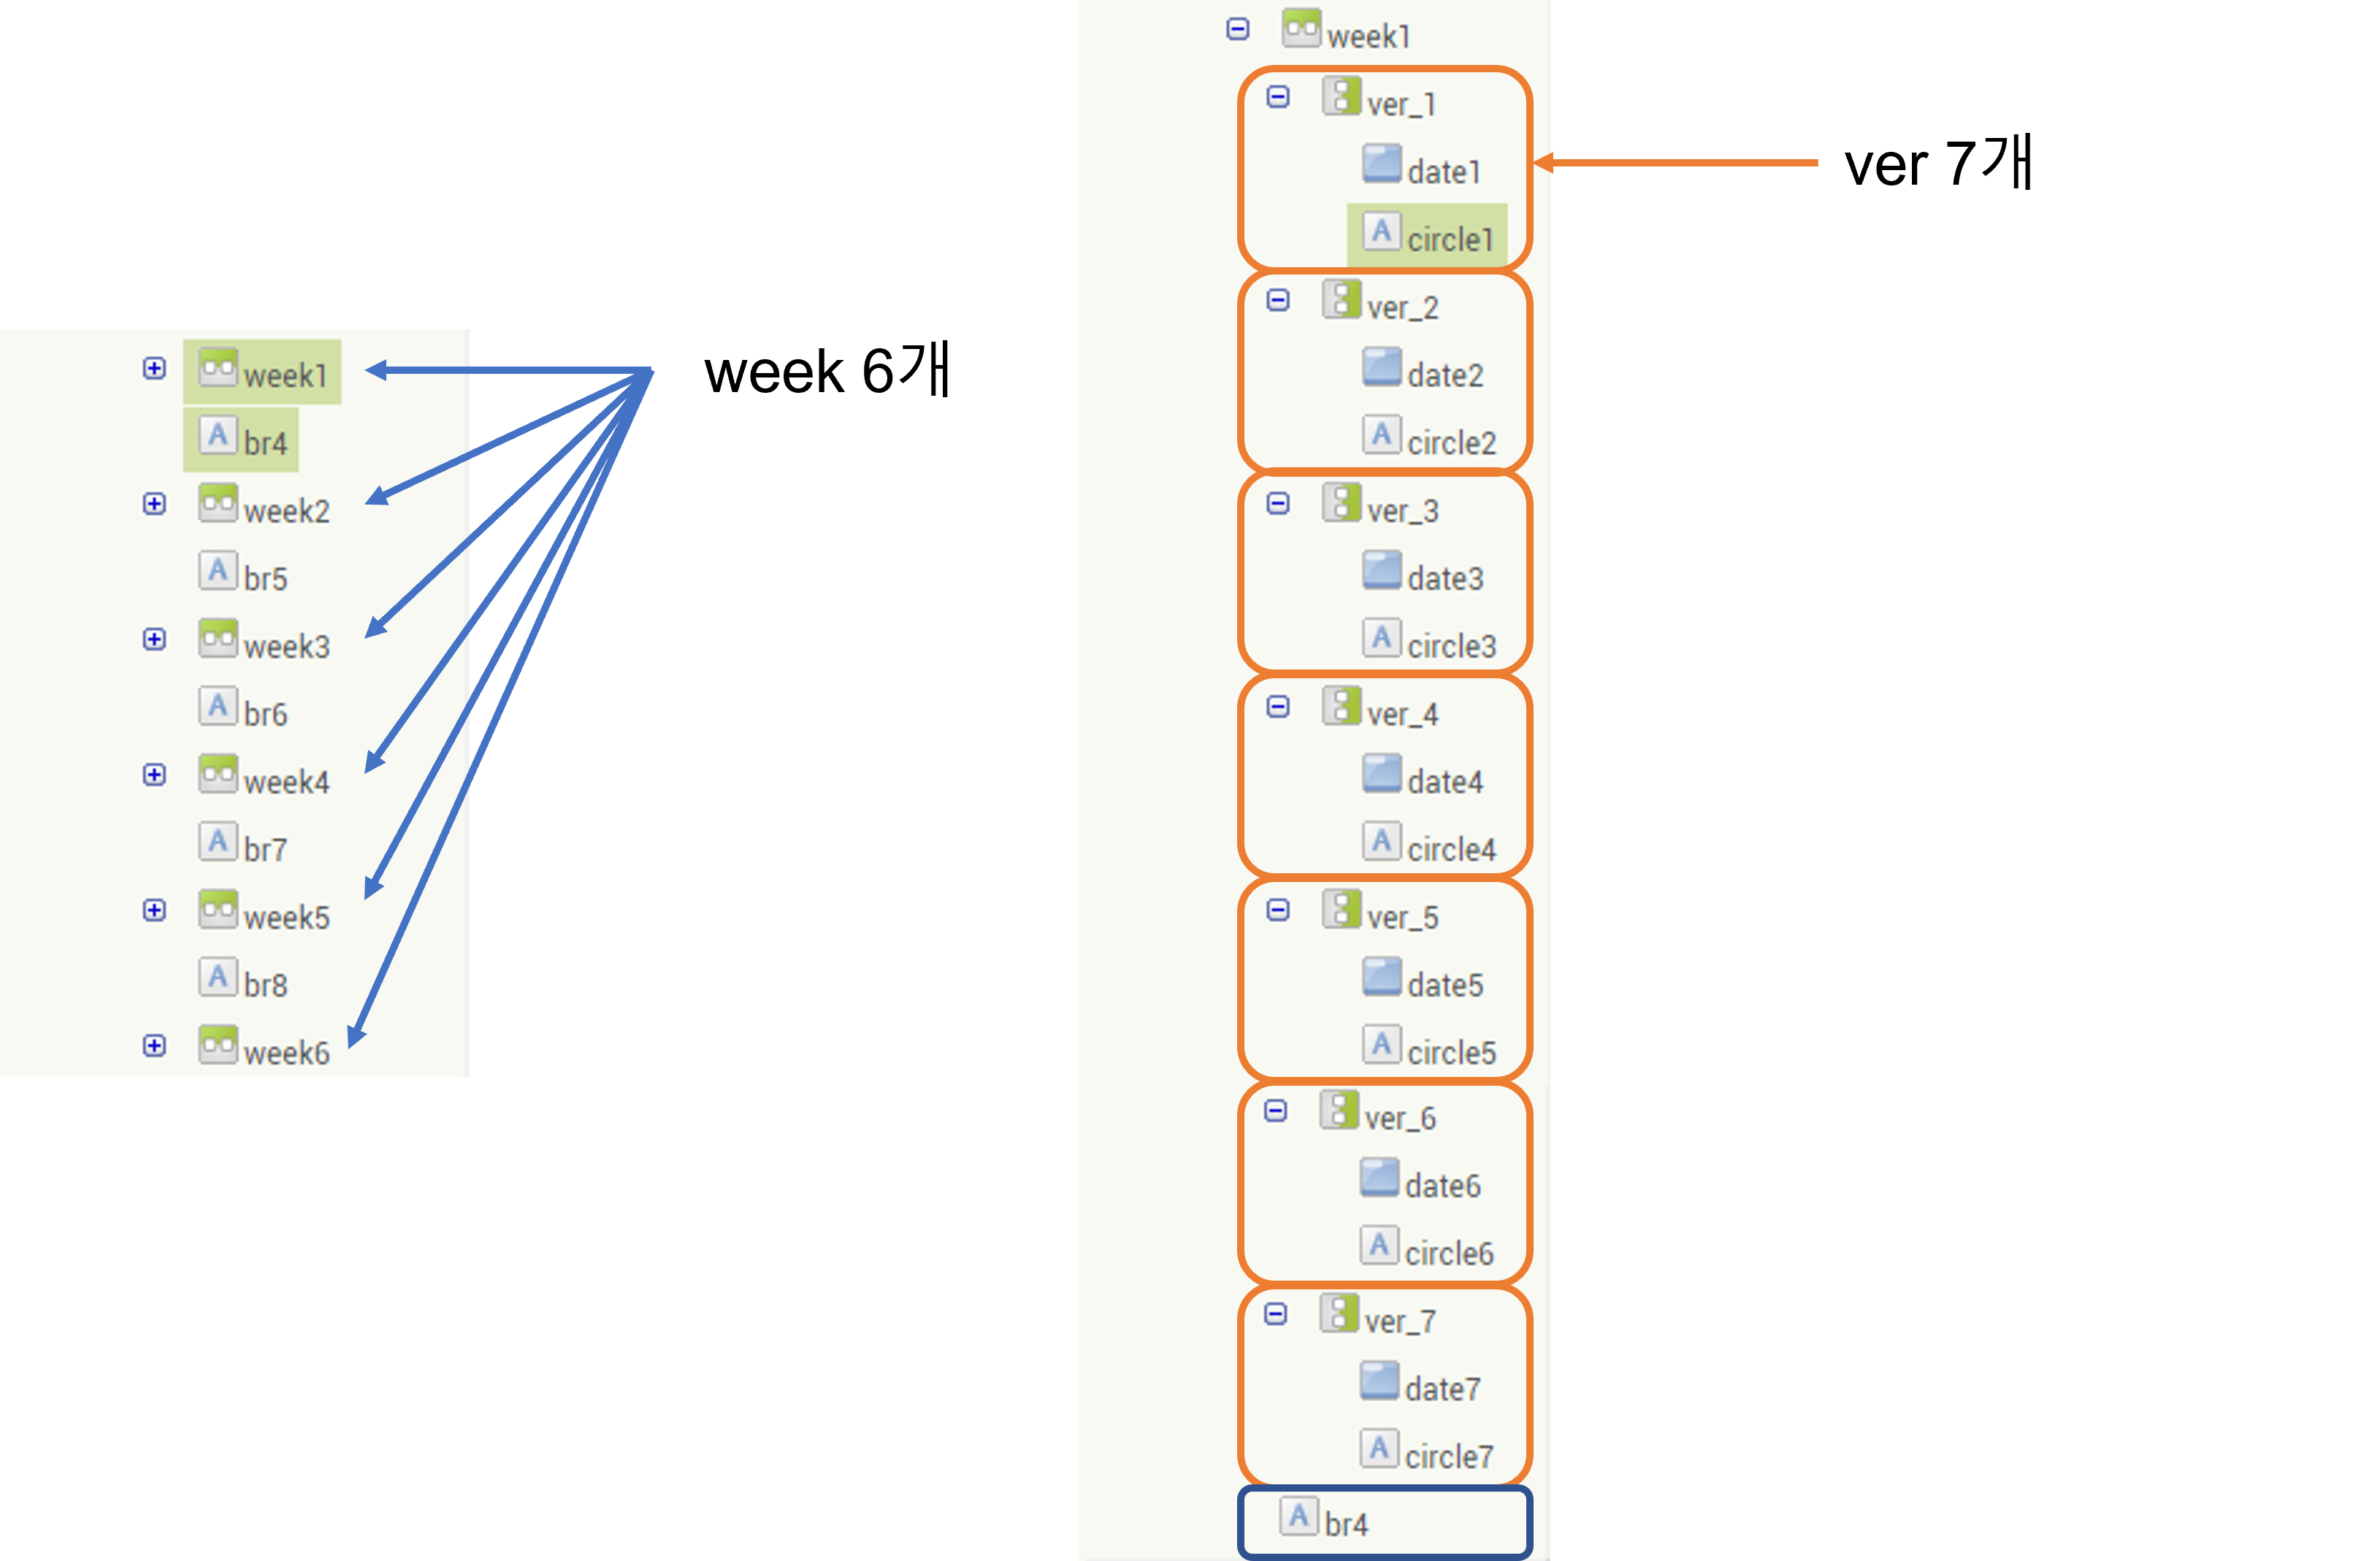
아래 표와 같이 HorizontalArrangement(수평배치)를 동일하게 6개를 만든다. 수평배치 week1, week2, ... week6까지 생성한다.
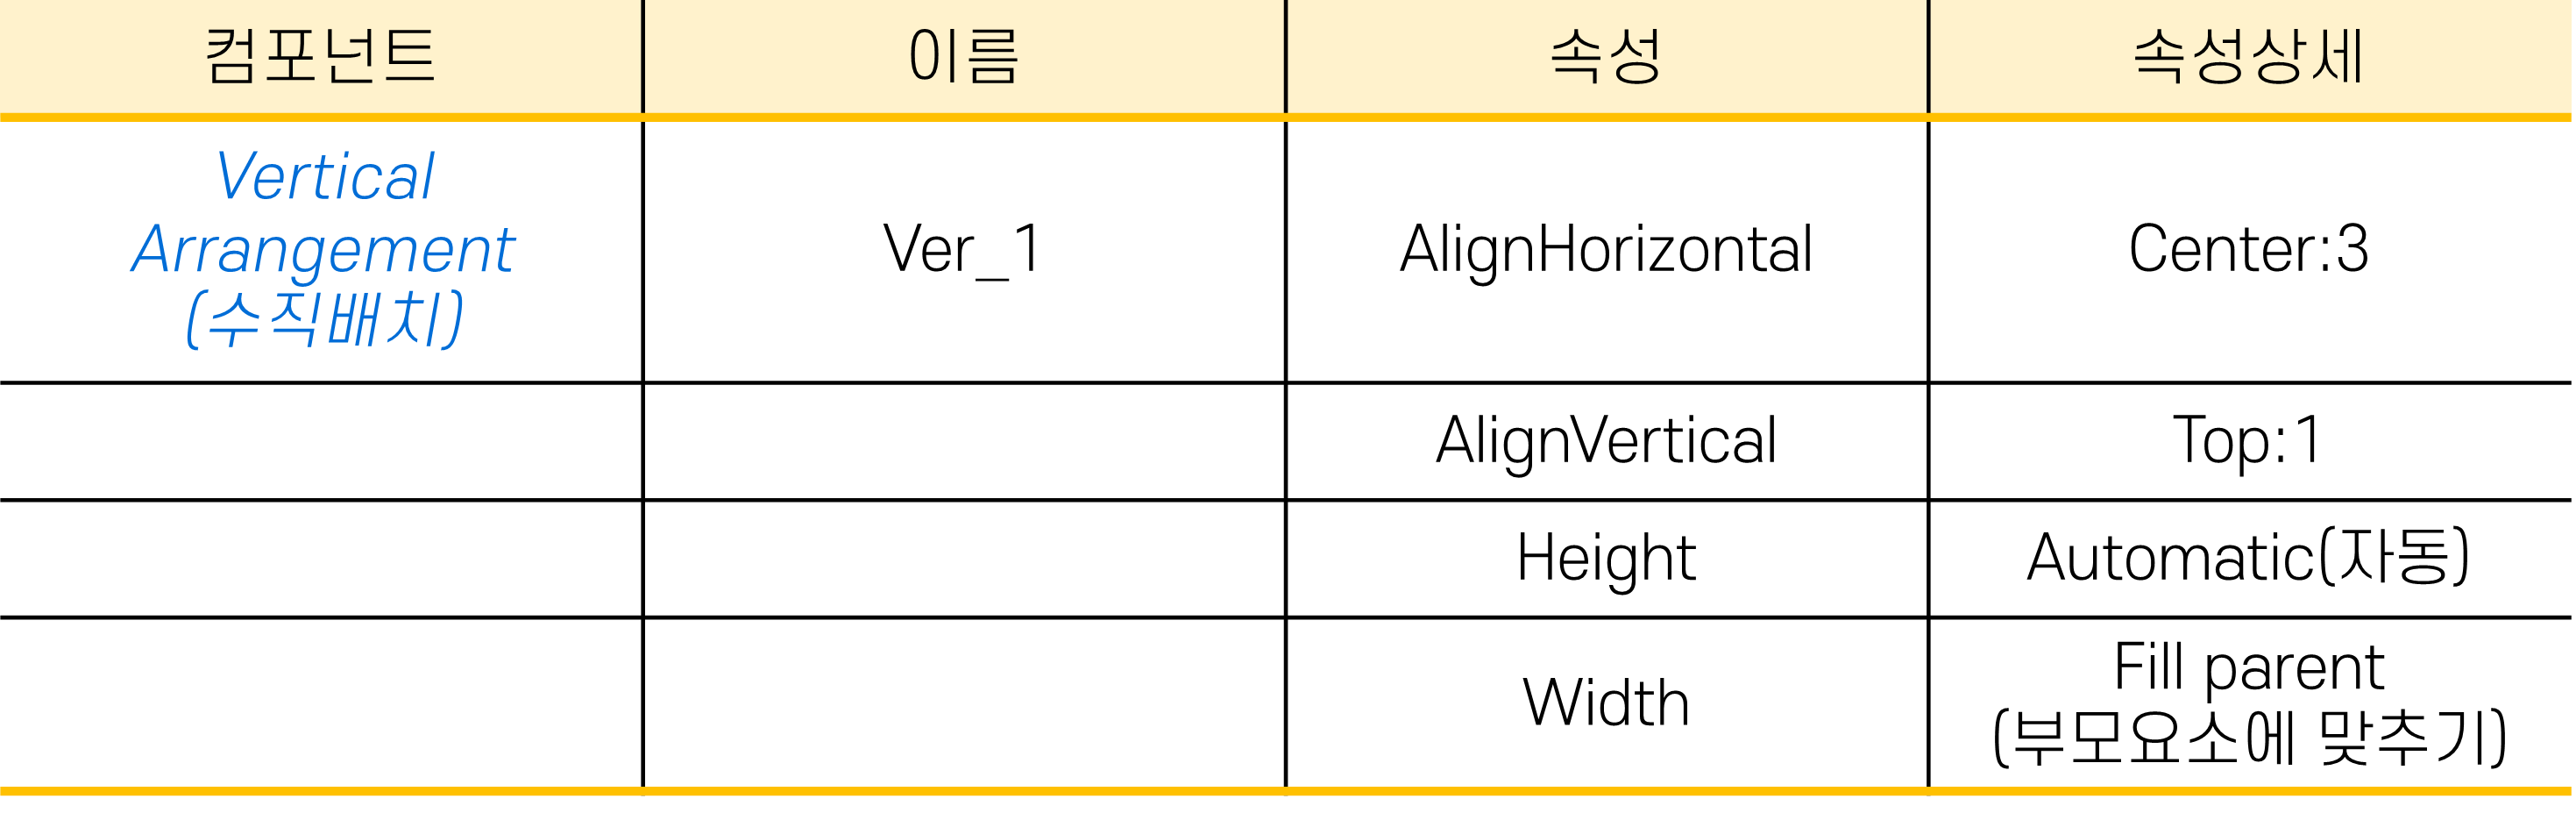
하나의 수평배치 (week) 안에는 수직배치(ver)가 7개 들어가도록 만든다.
수직배치(ver)안에는 버튼(date)와 Label(circle)을 만들어준다.
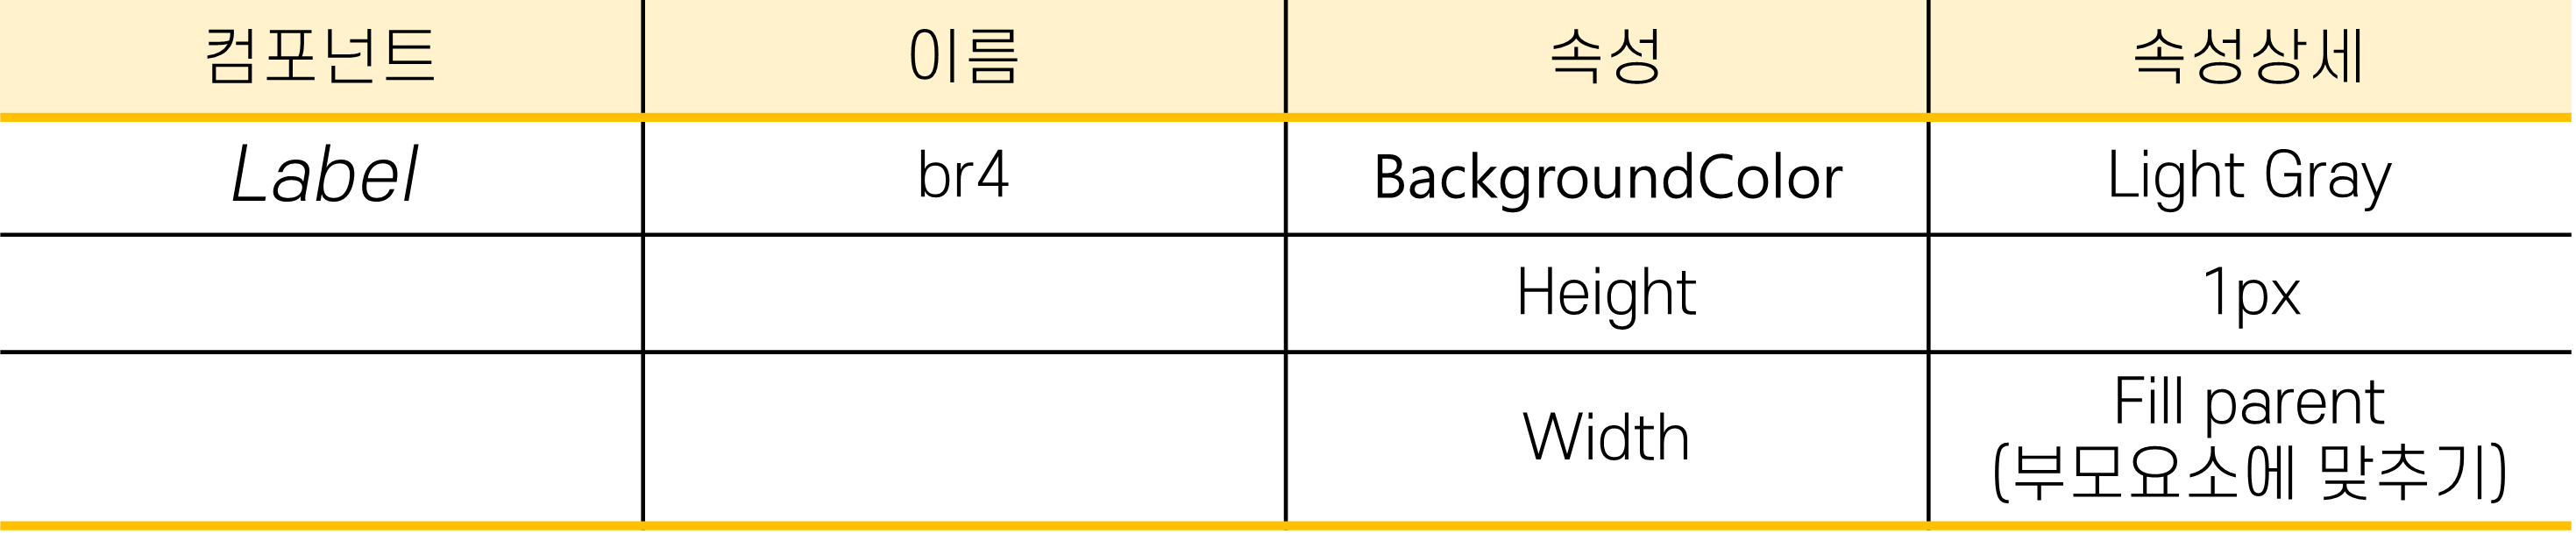
week하나가 끝날 때 마다 Label로 br을 넣어준다.

| HorizontalArrangement (수평배치) |
추가버튼 | AlignHorizontal | Right:2 |
| AlignVertical | Center:2 | ||
| Height | Automatic(자동) | ||
| Width | Fill parent (부모요소에 맞추기) |
| Button | 추가_버튼 | BackgroundColor | #dd5877ff |
| FontSize | 30 | ||
| Height | 50 pixels | ||
| Width | 50 pixels | ||
| Shape | oval | ||
| Text | + | ||
| TextAlignment | center:1 |
| Label | br10 | Height | Fill parent (부모요소에 맞추기) |
| width | 10 pixels |
다음 표부터는 앱을 실행했을 때 보이지 않는 화면으로, 추가버튼을 클릭했을 때 보이는 화면이다.
| VerticalArrangement (수직배치) |
추가페이지 | AlignHorizontal | Center:3 |
| AlignVertical | Bottom:3 | ||
| Height | 65 percent | ||
| Width | 97 percent | ||
| Visible | false |
| Image | 이미지1 | Height | 15 percent |
| Width | 20 percent | ||
| Picture | day-night.png |
| Label | minititle | FontBold | true |
| FontSize | 20 | ||
| Height | Automatic(자동) | ||
| Width | Automatic(자동) | ||
| Text | Oneday Record | ||
| TextAlignment | center:1 |
| Label | br12 | Height | 20 pixels |
| Width | Fill parent (부모요소에 맞추기) |
| DatePicker (날짜선택버튼) |
날짜선택버튼1 | BackgroundColor | #ffd27eff |
| FontSize | 15 | ||
| Height | Automatic(자동) | ||
| Width | 50 percent | ||
| Shape | rounded | ||
| Text | 날짜 선택 | ||
| TextAlignment | center:1 |
| Label | br13 | Height | 10 pixels |
| Width | Fill parent (부모요소에 맞추기) |
| VerticalArrangement (수직배치) |
입력_수직배치 | AlignHorizontal | Left:1 |
| AlignVertical | Top:1 | ||
| Height | Automatic(자동) | ||
| Width | Fill parent (부모요소에 맞추기) |
아래 표와 같이 Horizontal Arrangement, Label, TextBox를 동일하게 2개 만들어준다.
제목입력, 메모입력 / title, memo / title입력박스, memo입력박스로 각각 만든다.
| HorizontalArrangement (수평배치) |
제목입력 | AlignHorizontal | Center:3 |
| AlignVertical | Center:2 | ||
| Height | Automatic(자동) | ||
| Width | Fill parent (부모요소에 맞추기) |
| Label | title | FontBold | true |
| FontSize | 15 | ||
| Height | Automatic(자동) | ||
| Width | Automatic(자동) | ||
| Text | Title | ||
| TextAlignment | center:1 |
| TextBox | title입력박스 | FontSize | 15 |
| Height | Automatic(자동) | ||
| Width | 75 percent | ||
| Hint | 제목 입력 |
| HorizontalArrangement (수평배치) |
취소추가배치 | AlignHorizontal | Center:3 |
| AlignVertical | Center:2 | ||
| Height | 12 percent | ||
| Width | Fill parent (부모요소에 맞추기) |
아래 Button은 취소, 저장 두 개를 만든다. 그리고 취소, 저장 버튼 사이에 Label(br11)을 넣어준다.
| Button | 취소 | BackgroundColor | #66cfc7ff |
| FontSize | 15 | ||
| Height | Automatic(자동) | ||
| Width | 20 percent | ||
| Shape | rounded | ||
| Text | 취소 | ||
| TextAlignment | center:1 |
| Label | br11 | Height | Automatic(자동) |
| Width | 3 pixels |